KAVENZ VHP X SHOCK EXTENDER TECHNICAL DATA
The KAVENZ VHP X Shock Extender connects a trunnion-mount rear shock to the frame of your KAVENZ VHP X. Read this manual completely before installation and keep it for future reference.
SAFETY
- Always use a calibrated torque wrench and respect the torque values in this manual.
- Use only the hardware supplied with the extender. Do not mix in parts from other products.
- Never ride the bike if a part is cracked, bent, deformed or shows play.
- Do not modify, machine or file any part of the extender.
- Wear eye protection and work on a clean, stable bike stand.
COMPATIBILITY
Choose the extender that matches the eye-to-eye length of your shock. Both versions are for trunnion-mount shocks supplied without mounting hardware.
Part number | Product | Compatible shock |
|---|---|---|
1004771 | KAVENZ VHP X Shock Extender (185) | 185 mm trunnion shock, without hardware |
1004770 | KAVENZ VHP X Shock Extender (205) | 205 mm trunnion shock, without hardware |
Check your shock's eye-to-eye length before ordering; it is printed on the shock body or listed in the shock manufacturer's documentation.
INSTALLATION
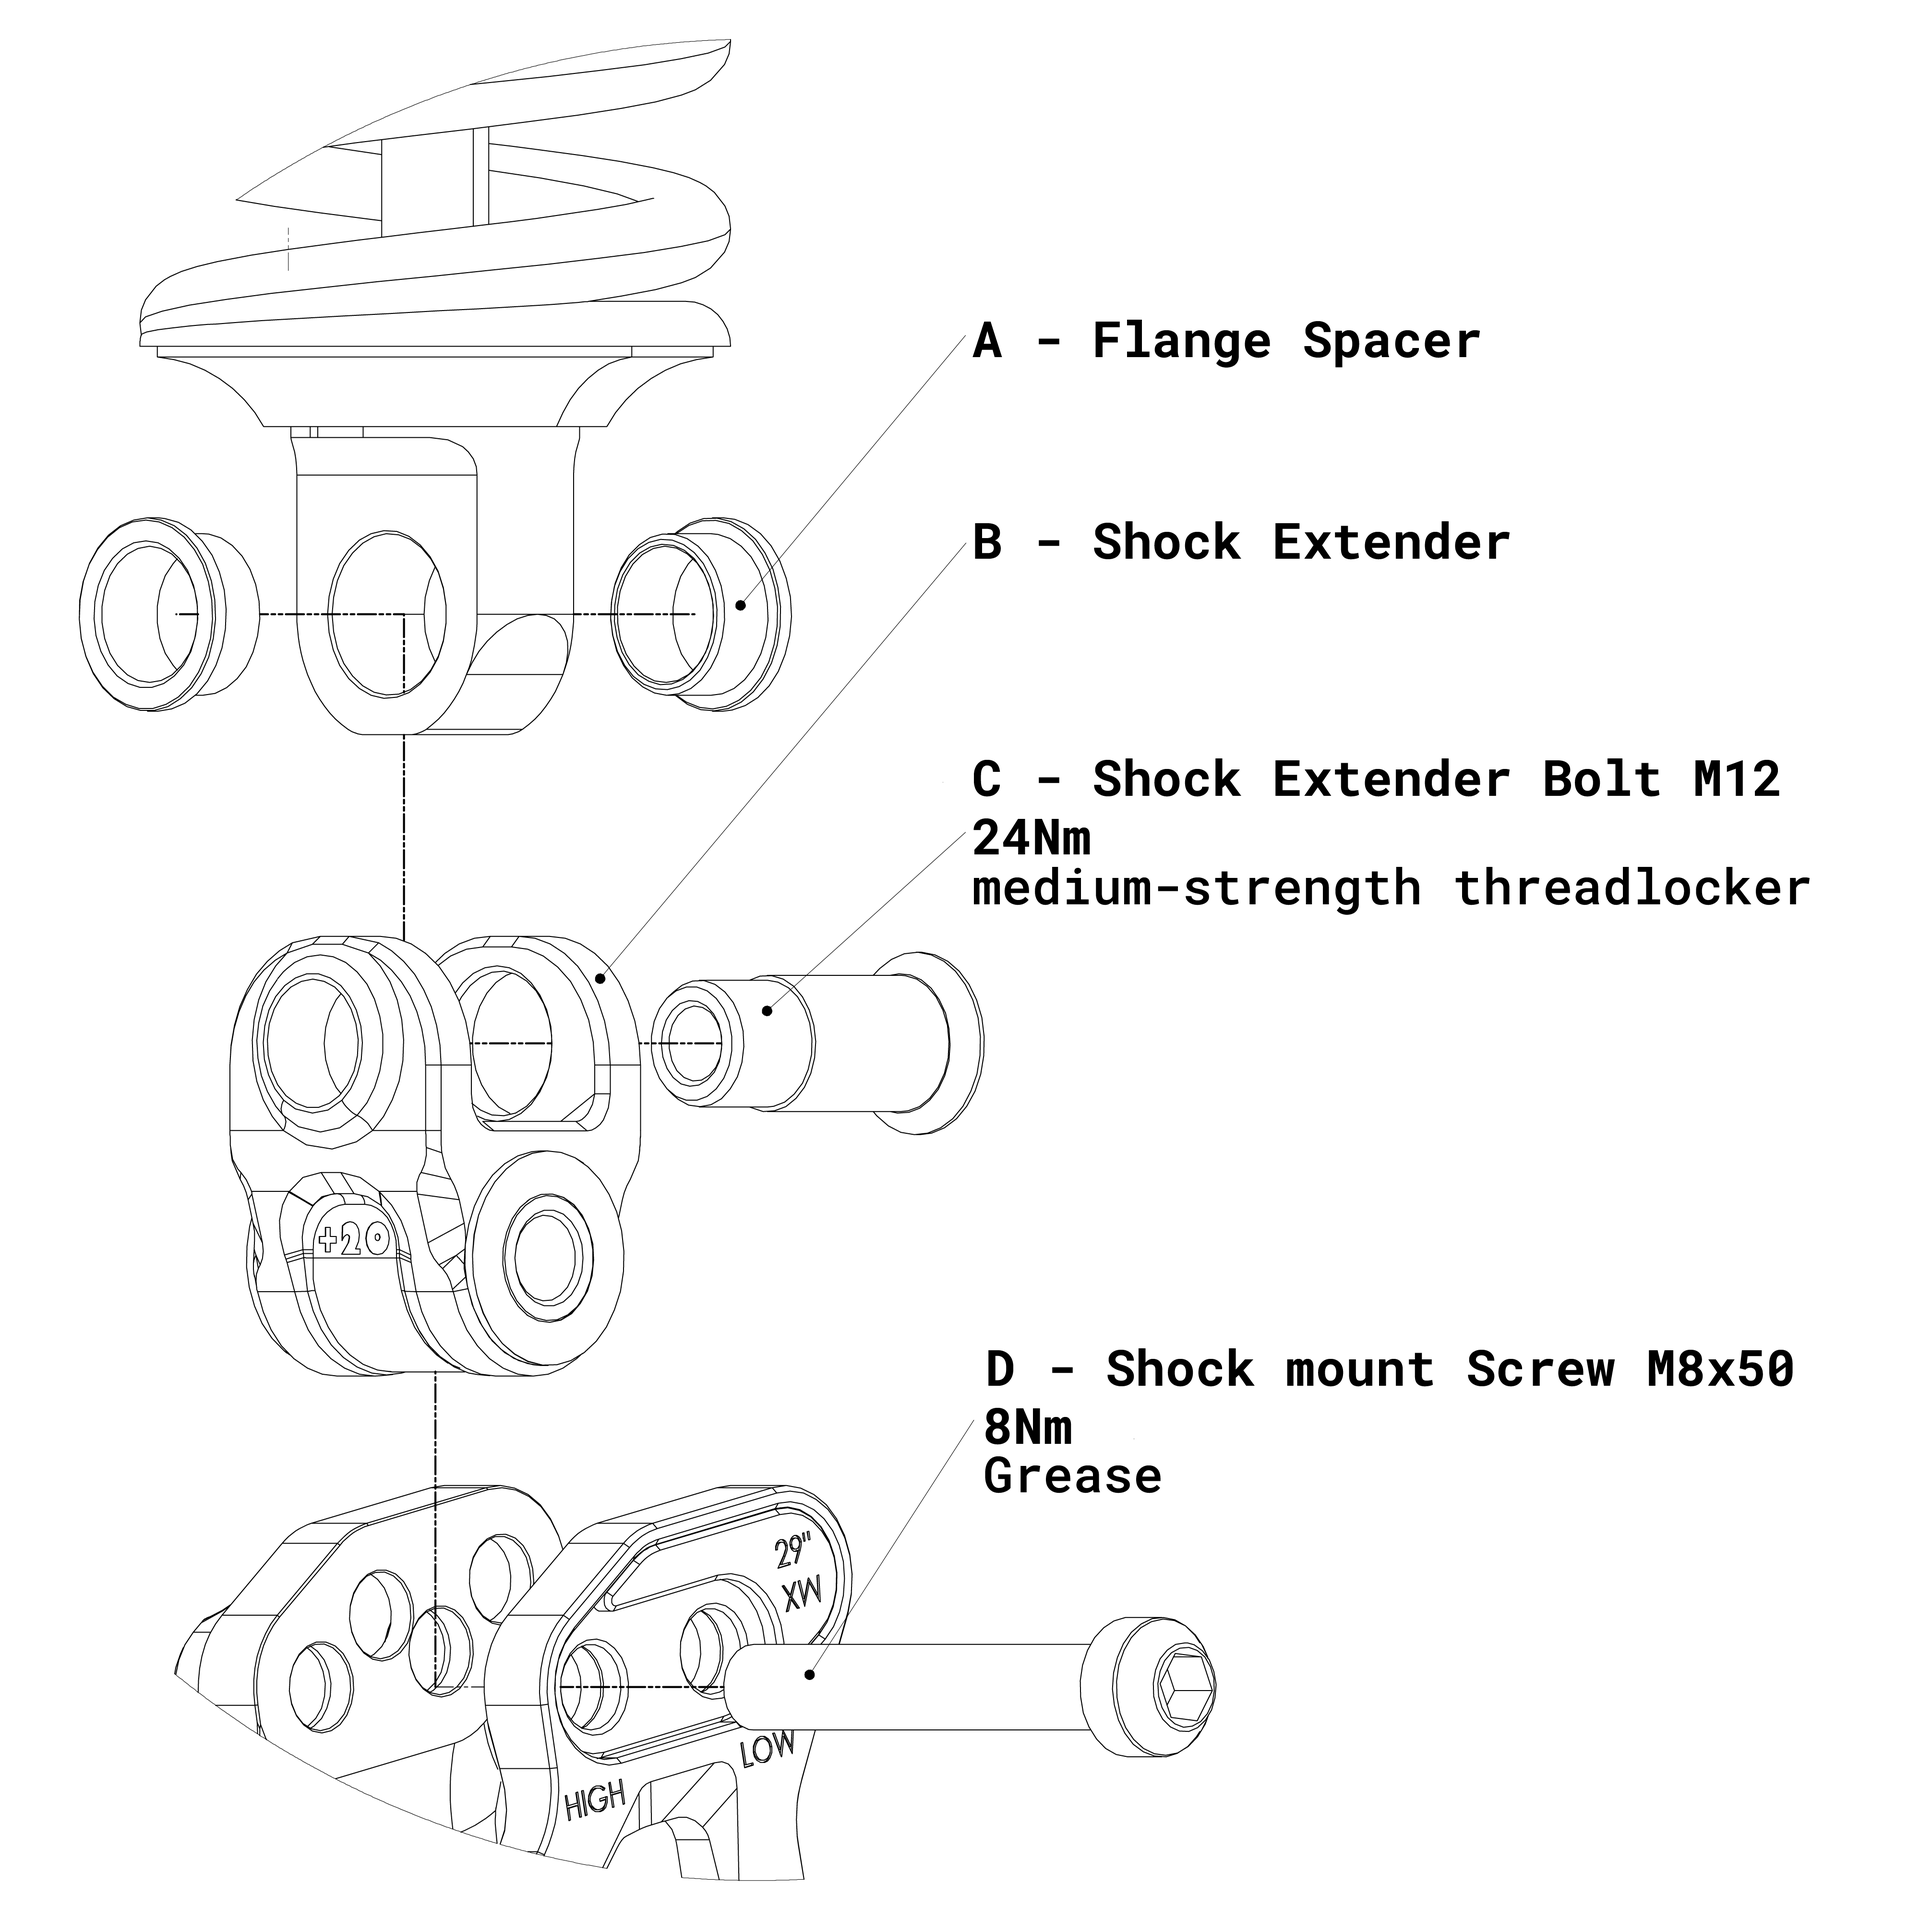
- Clean all parts. Degrease the shock eyelet, the extender bores and all threads. Threads must be clean, dry and free of old threadlocker.
- Fit the flanged spacers (A). The shock eyelet must be free of any mounting hardware. Insert one spacer into each side of the eyelet.
- Position the extender (B) on the shock. Align the shock eyelet with the upper bore of the extender.
- Install the shock extender bolt (C). Apply medium-strength threadlocker to the thread, insert the bolt and tighten to 24 Nm.
- Grease the shock mount bolt (D). Apply a thin layer of grease to the thread.
- Mount the assembly in the frame. Align the lower bore of the extender with the frame mount. If your shock has a piggyback reservoir, it must point toward the front of the frame. Insert bolt D through the frame mount and the extender and tighten to 8 Nm.
- Connect the trunnion end of the shock. Attach the shock's trunnion mount to the rocker as described in the frame manual: 12 Nm with medium-strength threadlocker.
- Check for clearance. Cycle the suspension slowly through its full travel and make sure the shock never touches the frame. We recommend removing the coil spring or releasing the air for this check.
- Set up the shock. Re-inflate the shock or reinstall the spring, then set the sag.
Let the threadlocker cure as specified by its manufacturer before riding.
TORQUE SPECIFICATIONS
Ref. | Fastener | Torque | Thread preparation |
|---|---|---|---|
C | Shock extender bolt M12 (shock to extender) | 24 Nm | Medium-strength threadlocker |
D | Shockmount bolt M8X50 (extender to frame) | 8 Nm | Grease |
Never exceed these values. Over-tightening can damage the threads, the shock trunnion or the shock mount.
CHECKS AND MAINTENANCE
Before the first ride, check the full travel with the shock deflated (air shocks) or the spring removed (coil shocks):
- Compress the rear suspension slowly through its full travel. Nothing may touch the frame, linkage or tyre.
- Check for play by lifting and pushing the rear wheel. No knocking or movement at the extender.
- Re-check both torque values after the first 2–3 rides.
Regular maintenance:
Interval | Task |
|---|---|
Before every ride | Visual check for cracks, damage and loose bolts |
Every 25 hours | Check torque of bolts C and D |
Every 50 hours or after riding in wet conditions | Remove bolt D, clean and re-grease, re-tighten to 8 Nm |
Whenever bolt C is removed | Clean the thread, apply fresh threadlocker, re-tighten to 24 Nm |
After a crash or hard impact | Remove and inspect the extender; replace if damaged |
TROUBLESHOOTING
Problem | Likely cause | Solution |
|---|---|---|
Creaking at the frame mount | Dry or dirty bolt D | Clean, grease, re-tighten to 8 Nm |
Knocking or play at the shock | Bolt C loose or bushings worn | Re-tighten to 24 Nm with fresh threadlocker; replace worn bushings |
Shock does not fit | Wrong extender version for the shock length | Check the Compatibility table |
Contact during full compression | Incompatible shock or incorrect assembly | Stop riding; check assembly and shock dimensions |
For spare parts, technical questions or warranty claims, contact your KAVENZ dealer or:
77designz UG (haftungsbeschränkt)
Harkortstraße 6, 46163 Münster, Germany
https://www.kavenz.com/support
Last update : 22.10.2026